Publishing Using a Third Party FTP Client
In some rare cases you might wish or need to publish a site using a third-party client (rather than Sandvox's built-in remote publishing).
It's generally best to have Sandvox manage as much of the process as it can. This allows changes to be published efficiently, and the publishing history of your site to be tracked.
To publish a Sandvox site using a third party client:
- Publish your site to a folder on your Mac. Choose a location that won't get in your way too much (i.e. probably not directly on your Desktop!), since you ideally want to keep this folder around for efficient handling of changes. If you plan on publishing this way multiple times, be sure to check "Publish to this folder by default".
- Use your third party FTP client to upload the contents of the folder to your server. Many clients offer a "Synchronize" feature which can upload only the files which have changed, to save time.
Repeat these steps each time you want to publish.
If you normally publish using Sandvox, and just want to do a test run of publishing with another client, it's likely best to publish your site to a folder one time, without checking "Publish to this folder by default".
Cyberduck
To upload using Cyberduck:
- Launch Cyberduck and click the "Open Connection" button at the toolbar.
-
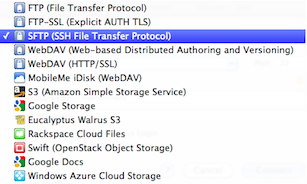
Select a protocol that your host supports. We strongly recommend SFTP if possible because it is more secure. If your host does not support it, FTP is likely your next best option.
-
Enter your hostname into the "server" field. Also enter your username and password. If you do not know any of this information, contact your host.
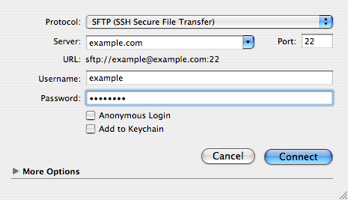
- Click the "Connect" button.
-
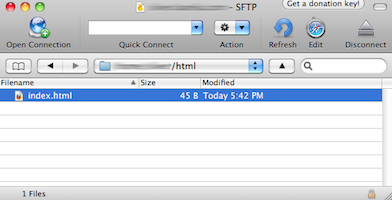
Once Cyberduck has connected to your host, find the folder to publish to and double-click it. If you do not know which folder this is, please check the documentation for your host (and if necessary, contact their technical support staff).
If you've never published to this host before, it may be necessary to create the folder first ("File" -> "New Folder").
For example, for the path /html/, you should see something like this:
- Open the "File" menu, select "Upload" and navigate to the folder where you have saved the site files for uploading. (IMPORTANT: DO NOT upload the Sandvox document itself. Please see above for how to publish your site ready for this.) Contained in the folder are files and folders, such as the
_Mediafolder, the_Resourcesfolder andindex.htmlfile, among others. -
Select all the files and folders in the folder.
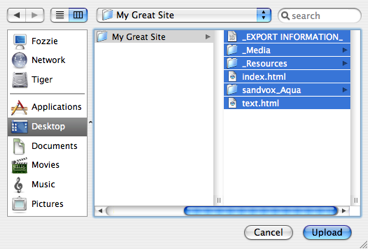
- Click the "Upload" button and wait for the site to finish uploading.
- Click the "Refresh" button at the Cyberduck toolbar to check if the files and folders have been uploaded properly.
Keywords: cyberduck, cyberducks, cyber, duck, ducky, cyberducky, export, exporting, exported, export, site, sites, upload, uploading, uploads, uploaded, manual, manually, by, hand, ftp, sftp
